Wednesday, July 15, 2020

Wyoming heading North


With a mere 4 hours of work removing all the glue left from the old ones, then new insignia were installed! Not perfect but a lot better than the old ones.
And suddenly it was time to move on. What a fun couple of weeks this has been.


We decided that from our experience so far we don’t need to make reservations in advance. Campgrounds haven’t been full and have been more than glad to have us stay. After Vernal we would go back to our regular method of wandering without plans.

Our general plan was heading North and East towards South Dakota taking roads we haven’t been on before, staying a couple of nights here and there or longer if we wanted to experience more of an area.

Lander was our intended spot the following night but about halfway there we turned onto WY 28 on a windy afternoon to see an illuminated sign saying “South Pass closed to highsided vehicles, 60+ MPH winds”. We backtracked a couple of miles to the intersection at Farson WY to review our alternatives.
A lot of nothing in Farson
Farson isn’t a fancy place. There’s a gas station and a general store. That’s it. Oh and a big dirt lot behind the gas station. We had a cell signal so got on our favorite app “RV Parky” to look for somewhere to camp.

There wasn’t anywhere within 70 miles, and we would have to go back on our tracks to get to that one. We went into the gas station and asked if we could stay on the dirt lot out back. They said to help ourselves, so that was where we stayed the night, dry camping and using the generator and our ROKU to stream TV while the very strong winds rocked the rig.


The next morning we awoke to a sunny day with calm winds and we set out at the unearthly hour of 7.30am for a different destination than we had intended. Instead of Lander we headed for Thermopolis WY and we were rewarded by a magnificent drive thru the South Pass of the Rockies across the Continental Divide and the tracks of the Pioneers.

Wind River Gorge


Another 100 miles brought us to another great area, the Wind River Gorge thru which the Big Horn River flowed, and into Thermopolis.
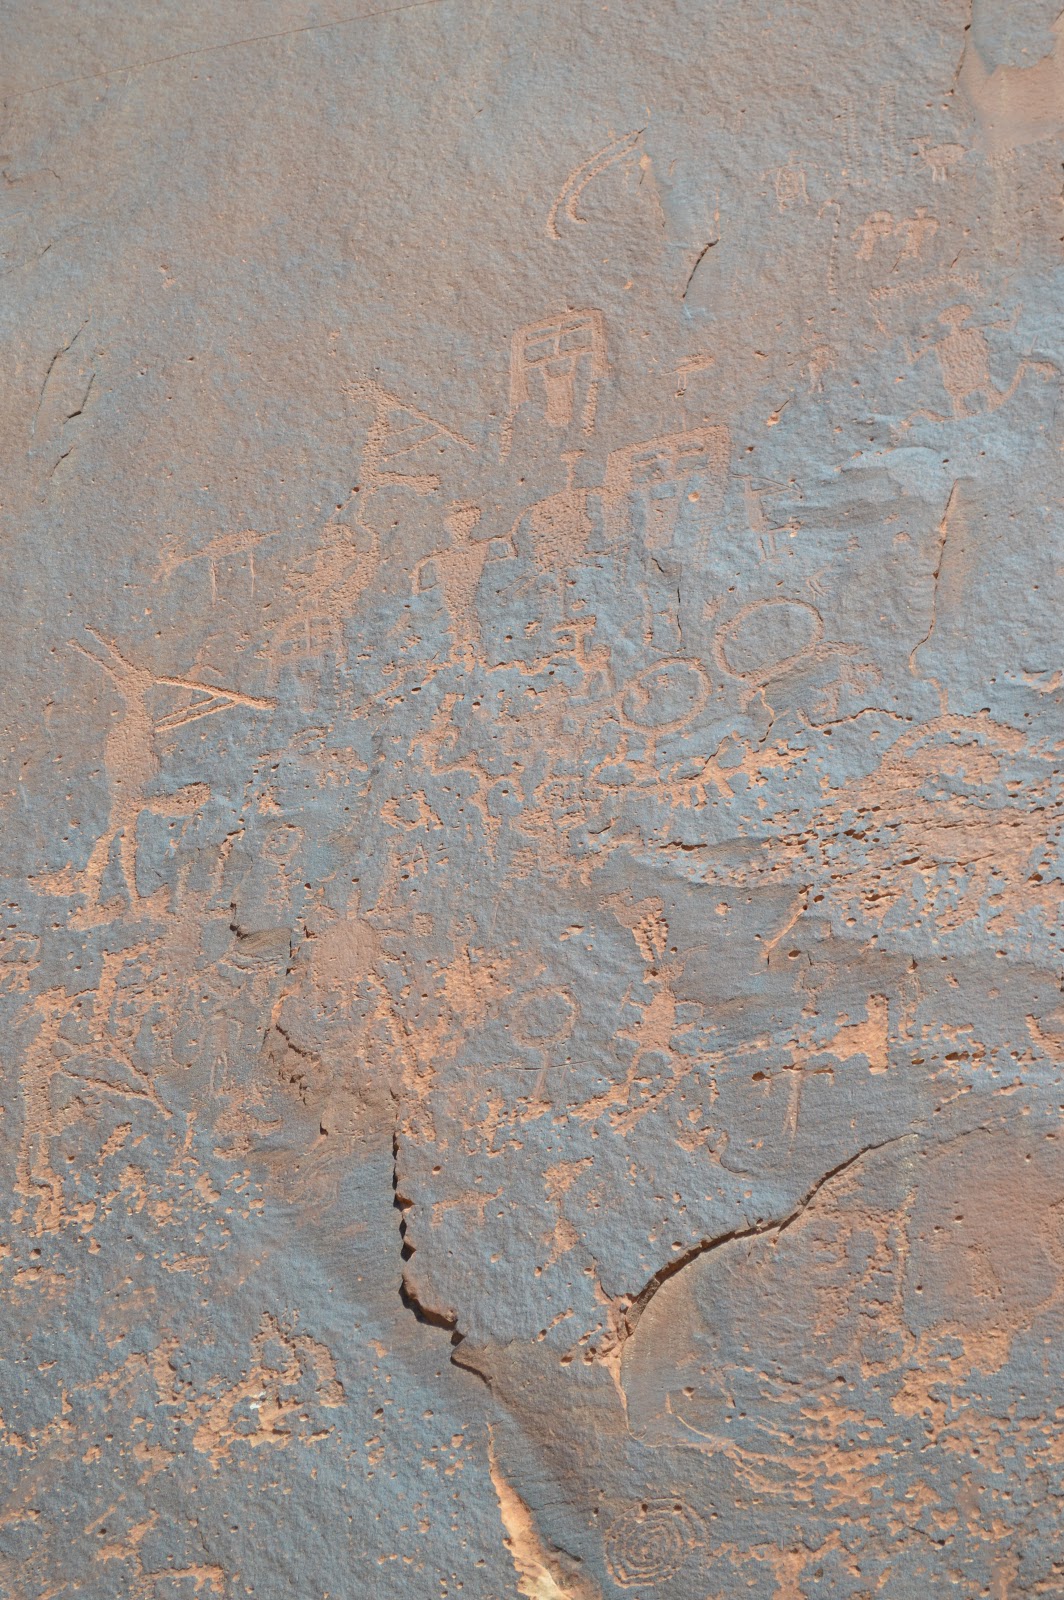
The swastika's are Indian symbols in Thermopolis
The Eagle campground was right there and had just had somebody cancel their reservation so we got the last vacant spot! 2 nights here would suit us just fine!

Thermopolis is a pretty little town and better yet has a brewery! Naturally we sampled their beer and we enjoyed lunch a couple of times too.

The rig had come up with another little problem. The new (Much larger) tire I had fitted to the front grabbed the left front mudflap and flipped it over, bending the steel bracket it was attached to. This caused it to rub on the tire on full lock. Fortunately this only occurred briefly on extra sharp slow speed corners, but the noise was fearsome! The campground owner lent me a grinder with a cut off wheel and I had the bracket off in a minute or so. No more noises!

The Occidental Hotel once frequented by Teddy Roosevelt

Buffalo Bill drank here too

Under the floor was the cellar.
The route we were now on continued to follow the Big Horn River. The scenery was spectacular. As we headed North East towards our next stop Buffalo Wyoming we climbed and climbed over the Powder River pass, 9500’! 

The Monaco having a big diesel engine in the back sailed up the incline almost silently. We both remember the Rexhall on passes like this. It would have been flat out in 1st gear with the engine screaming between our seats. We still miss that old rig though, lots of good memories. 


Old Town Buffalo, a very clean and tidy town.

The Elks Lodge symbols (Closed the day we were there!)

Buffalo was nice too and a trip to Sheriden led us to Fort Phil Kearny where the biggest defeat of the US Army prior to the Little Bighorn took place. 
These were the real Plains Indians around Fort Phil Kearny
The museum took the white mans side, although it did mention the many treaties made and broken by the US Government, all of which became a hindrance when Gold was discovered in the area. The tribes came together and pulled a masterful ambush of a cavalry unit who disobeyed orders by following a decoy into an undefendable valley.

Just a reconstruction of the Fort which was burned by the Indians after it was abandoned by the Army.


Then we moved on again and had a boring trip down I90 as there aren’t any side roads to take. This brought us back to our “Home” state of South Dakota and a few nights near Deadwood where we came during a huge car show 5 years ago. With less people we had a chance to explore in depth, only to be disappointed by the tacky tourist nature of the place itself.
All the tourist trappings in Deadwood

T Shirts everywhere

Some stately buildings hidden by the bling.
We have had good weather (apart from some high winds) since we left Casa Grande, so our first night at the Steel Wheels CG surprised us with the heaviest rain we have ever experienced! It sounded like a giant fire hose was being directed straight down onto the roof of the rig.

We were doubly lucky in that it lasted only about 20 minutes at that strength and the really great news – the new slide seals and the work we had done at D&R RV before we left have cured the couple of slight leaks we had in the past.

Wednesday, July 8, 2020

Utah


We also learned to look at places before we go in to find out if we feel comfortable with the Covid prevention steps inside.

Utah to me is where all the great National Parks are clustered. Zion, Bryce Canyon, Arches and many more are in the south and east of the state. We have visited lots of them and got burned out with the crowds of tourists.

We have to travel North to get to South Dakota and decided to travel up the far eastern side of Utah in the area known as The Four Corners. It's name comes from the point where 4 states touch. I think this is the only place in the US that this happens.

We picked the small town of Blanding, because it is between Monument Valley and Valley of the Gods, two magnificent geological areas. It is also in an area where the ancient tribes lived and their traces are still here.
Pueblo ruins in Blanding
Right in Blanding is a Pueblo ruin that dates back perhaps 2000 years. We learned that the pueblos are built on high ground that allows distant views across the landscape which adds to their beauty today.
Twin Rocks in Bluff UT

Bluff Fort

Tools of the pioneers
Down the road in Bluff we explored the fort built by the Mormons then the petroglyphs in the cliffs at Sand Island nearby.
We had wanted to explore Monument Valley in depth but it is on the Navajo Nation property and they have closed it due to covid. 

Instead we visited Natural Bridges NP on our way to an area called Valley of the Gods.
Hard to see the rock art but when you see it it suddenly appears everywhere
Access, we read in the brochures, was possible to vehicles with high ground clearance. Clearly the Miata being a sports car didn’t fit that description, but we figured if it got too bad we could turn around.
Gravel roads down to Valley Of The Gods

Amazing geological formatios

Huge formations
It was quite exciting in that the road was 28 miles of dirt and rocks but we only ground the bottom of the car once and the Miata has metal plates over all the vital parts underneath. We got a few stares from big SUV’s coming the other way!

Newspaper Rock North of Blanding has very clear Petroglyphs

Natural Bridge NM also Near Blanding
It really was worth the time though and the scenery was incredible.
As we had a week we did some exploring in depth and then moved on to Vernal Utah where we have been before and like. LINK
Vernal was one of early full-timing stops way back in 2015 when we towing the Fiesta with the Rexhall. 
We stopped at the same CG Fossil Valley RV Park. It was very quiet when we arrived and the manager welcomed us with open arms, showing us the sites we could get a satellite signal at (Tall trees being a problem). He also told us about some local events.

The friendly RV Park Owner

Sheep Canyon
The local theater group were performing South Pacific at an outdoor venue which sounded intriguing. We do enjoy theater and this sounded like we could enjoy it in safety as they had seats well separated from other theater goers and it was open air.

The Miata at the Car Show

Some sketches I did

The other event was a car show that was free to enter and included dinner and a free T Shirt! Heck we would even wash the Miata for that! We had a great drive around Sheep Canyon and the geological scenic loop before arriving at the show. There were tons of cars of all kinds and I sat and sketched some. Kids were seemingly fascinated by a car with no roof and I had a lot of fun demonstrating how the soft top went up and down.

The free T Shirt
Vernal is a small town but has a great atmosphere. The Heritage center was open an interesting but more importantly so where the THREE breweries! There is a nice Elks Lodge too and they had a dart board so Barbara and I enjoyed a couple of games after a nice chicken dinner there.

The CG owner mentioned the business next door who makes vinyl signs. One of the things I have been meaning to do is get some new Monaco insignia's made to replaced the ones on the coach that have missing letters. After an hour or two getting the fonts right they had them printed and with a mere 4 hours of work removing all the glue left from the old ones, then new insignia were installed! Not perfect but a lot better than the old ones.
And suddenly it was time to move on. What a fun couple of weeks this has been.

Monaco insignia replacement


We love our 2009 Monaco Cayman and think the paint scheme is one of the prettiest out there. The only letdown which seems to be pretty common is the stickers that tell you the make and model.


The silver "MONACO" has gone only the "C" in CAYMAN is left. The rest is just the glue under the lettering

The originals are a chrome like raised lettering and as they age the glue weakens and letters start falling off. From all I have read the replacement letters are impossible to locate since Monaco went bankrupt just after ours was built.

I’ve been thinking for a while that I could probably get a vinyl sign shop to make new ones. I imagined they would just photo replicate them and they would magically appear!

We were recently in Vernal Utah and in conversation with the campground owner he mentioned he’d had some stickers made for his car locally. I set out to find the store.

First off I got out my tape measure and held it up alongside the original in two directions to get the sizing. I made sure the camera was square to the existing stickers to avoid getting any parallax errors.


Recording the width

And the Depth. Keep the camera square

Once at the store I explained what I needed and we set out to make replacements. First off they told me that they can not replicate the raised style lettering of the original. They are made using a molding technique that sign shops can’t duplicate. They couldn’t match exactly the chrome like finish either, they are limited to the pre-colored sheet vinyl they either have in stock or can order. Fortunately for me he had a silver color on the end of a roll in his scrap tray that was wide enough to do 2 stickers side by side if he was extremely careful lining the roll up in the cutting machine.

What I imagined to be the easy bit was actually what took the longest time and that was matching the fonts of the existing lettering. First he took my photograph and imported it into his software. Because it was a picture of the glue and a shiny set of letters the software had difficulty picking it out from he background. I played with the image on my phone, reducing it to black and white then increasing the contrast. 

Once it was in he was able to scale the image up to the full size of the original. Without me having the tape measure in the picture this would have been just guesswork. Next he scrolled thru literally HUNDREDS of different fonts to find one that matched most closely to the original. Apparently Monaco used unique fonts. After some trial and error and some stretching of the font we picked we got a pretty good match.  If you want it perfectly identical you are going to have to try somewhere else, but this is pretty darned close and the right size for the coach. That is as far as the MONACO part goes! The CAYMAN is a whole other font and it took a lot of searching around the internet to find something close followed by some stretching, compressing and some fancy work around the hole in the A’s to come up with an acceptable match.

After that the cutting of the stickers was relatively simple and I had 3 cut which is right for my coach. When he set the roll in the cuter the first time it was too close to the edge and several letters had the edge of the perforations in them. He gave me that one free and reset the roll for the last 2.


The new sticker under the backing paper

Back at the campground I got my stuff together. Fortunately I had bought some vinyl erasers when the “Invisible Bra” on my car discolored and drove me nuts trying to get it off again. I got mine from Harbor Freight I believe but you can get them thru Amazon or E-Bay. They aren't expensive.

This isn’t going to be a gloriously successful How To Do It post. I screwed up a couple of times so you may want to pay attention and avoid my mistakes.

I started on the left of the coach on the sticker under the drivers window. I carefully eased the last of the raised letters off using the tip of my pocket knife. Underneath was some thick serious glue/ body tape. It had stuck to the coach well but not to the back of the letters.


Lifting one of the old plastic letters with my pocket knife

I started with the vinyl eraser. Here’s my big error. I let the speed build up on the drill and pressed hard. The eraser smeared the glue around and I didn’t see that it had gone thru the paint in a couple of spots. My bad. LESSON 1 use a slow speed and don't press hard. I got most of the glue/tape off but there was still a lot smeared about. I used some artists paint thinner that I just happened to have and it did a good job removing the rest.

The vinyl eraser is good BUT USE GENTLY

I thought that would be that but when I looked there was a hard raised line around the edges of where the lettering had been. When I examined it it looked like a hardened lacquer. I could not budge it with the paint thinner. I tried the blade of my pocket knife trying very hard not to scratch the paint. My Bad. LESSON 2 after messing around for a while I tried the back of the blade and it worked better than the front, scraping off the lacquer and not scratching the paint underneath.


The shadows and the white where I ewent thru the paint!

The back of th pocket knife blade took off the hard outline and DIDN'T scratch the paint

I washed the surface down then when it was dry I used some alcohol wipes to remove any oils etc from the paint. I had set some masking tape up as guidelines for placing the new sticker. This worked well. Unfortunately I managed to get a wrinkle in the C of Cayman. I have the scrap sticker so I can go in later and replace that one on its own.


Tape to align the new sticker and the new sticker in place (With white where I went thru the paint!

I sat and contemplated what I’d done and I wasn’t happy with the burning of the paint with the eraser or the scratches I’d put in the paint. I went to the local auto pats store and bought some Goo Gone and some liquid rubbing compound. I used the rubbing compound and a little buffing wheel in my Dremel tool to polish out the scratches CAREFULLY around the lettering.


I tried a plastic scraper too but it was only good to remove the glue

I tried the one on the entrance door next using the eraser carefully followed by the Goo Gone. The eraser worked fine and didn’t damage the paint. The Goo Gone worked well but slowly, requiring multiple applications and lots of wiping to get the glue off. It didn’t remove the hard lacquer-like lines around the letters and I had to carefully work with the back of the knife blade to get that off. This time I didn’t scratch any paint !!


GOO GONE was OK but slow

Once I’d washed it and wiped the area with the alcohol wipes I decided to use some masking tape to hold the new sticker better in an attempt to prevent any wrinkles.


On the door I had to separate the MONACO from the CAYMAN due to the difference in the width.

I suddenly noticed that the CAYMAN part of the sticker was hanging over the edge of the door! It turns out the stickers for each side are different because to the limited width of the door! I hadn’t checked. My Bad. LESSON 3 check each location and take pictures with a tape measure in them. It would have been simple to adjust the spacing of the 2 lines.

I cut the MONACO from the CAYMAN so I could move the CAYMAN part over. Note that I had the whole set of lettering made on a single backing sheet so that I wouldn’t get one crooked. Guess what? I got the MONACO on straight but the CAYMAN was a little crooked. My Bad. Lesson 4 double check the alignment before you pull off the backing sheet.


No wrinkles, No hard outlines, no rubbing thru the paint BUT THE CAYMAN IS CROOKED

I also had a few bubbles under the new sticker but working them out with the edge of my Good Sam card BEFORE the clear cover was removed got rid of them. If you take the clear cover off you risk tearing the letter or discoloring it.


Good Sam cardgets out the bubbles BUT UNDER THE COVER FILM PLEASE!

So there it is. I spent 4 hours doing this and I still have the back one to do. That will have to wait for another time.

If you want to try this yourself the sign shop Jet Blast Designs 435 823 1890 of Vernal Utah (owner Aeryk Hurley) has saved the pattern and I’m sure he will gladly sell you some like mine. BEWARE of the one on the door being slightly different and is you separate them try and do a better job of keeping them straight than I did!